 Show All
A PivotTable list is an interactive table that you can use to analyze data dynamically from within your Web browser. You can use a PivotTable list to view and organize data from lists or databases, look for information or details, and create personalized summaries and reports. You can also add, edit, or delete the detail data that is displayed in a PivotTable list.
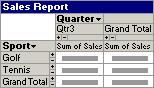
The following illustration shows a simple PivotTable list that displays summarized data.
When you create a PivotTable list, you select data from an external database or other source that you want to make available to viewers on your Web page. This data becomes the source data in the PivotTable list. You can then set up an initial presentation or view of the data, such as the summary shown in the preceding example, that analyzes the data in one of the many ways possible. You do this work in a design program, such as Microsoft Excel or Microsoft Access.
After you make the PivotTable list available on a Web page by publishing it, users who have the Microsoft Office Web Components � and a browser that supports PivotTable lists, such as Microsoft Internet Explorer 4.01 or later � can also analyze the data. In the browser or other run-time environment, users can display different fields and change your initial view to suit their needs. Depending on your design program and methods, you might also be able to make the PivotTable list available in programs other than browsers.
The Microsoft Office Web Components provide a set of tools that you can use to include interactive PivotTable lists, spreadsheets, and charts on your Web pages. Each component has features and capabilities that suit it to particular uses.
A PivotTable list is the right choice when you want to provide information from a database � such as Microsoft Access or SQL Server records or OLAP data from a Microsoft SQL Server OLAP Services database � in a form that users can interact with and analyze from within the Web browser or in a run-time environment. You can also choose to allow the user to add, edit, or delete detail data.
Here are some examples of good applications for PivotTable lists:
If users will view data without interacting with it, a noninteractive table might be a simpler way to display static data. For information about other ways to make data available on a Web page, see Help for your Web page design program.
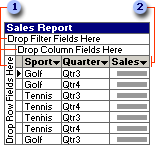
The following series of examples show how you, working in a design program, or a user, working in a browser, could turn a set of records from a database into a summary report. In the simplest form that you can create, a PivotTable list displays the records from the source data in a grid with the field names across the top. The following example contains fields named Sport, Quarter, and Sales.
 Drop areas
 Detail fields
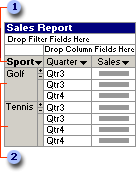
You can create a summary by moving fields to other areas and sorting fields to produce a logical organization. For example, the PivotTable list that follows takes the preceding example and shows how you could create a summary by moving the Sport field to the row area to organize the data by sport, and then sorting the Quarter field to put the sales in chronological order.
Row field
Items
To compare the sales for each sport in each quarter, you can move the Quarter field to the column area, as shown in the following illustration.

Column field
Items
To view and compare total sales instead of the detailed sales data, you can add a Sum of Sales total field and then hide the detail data for the Sport and Quarter fields. A total field provides the values that are summarized in the PivotTable list. In the following example, the lower-right cell shows a total of the Tennis sales in Qtr4 � that is, the sum of the sales figures from every row in the source data that contains Tennis for the sport and Qtr4 for the quarter.

Total field
To create the summary report that is shown at the beginning of this topic, you could then display grand totals for the Sport and Quarter fields.
To further analyze the data, you could filter the fields to find specific data. For example, you could display only the data about tennis sales in the third quarter. You could also add other calculations to the list. For example, you could display the largest sales amount for each sport.
 Designing and publishing a PivotTable list
If you need general information about Web page design, consult Help for the program you use to create your Web pages or Web site. Two programs that you can use to create Web pages with PivotTable lists are Microsoft Access (available in the Microsoft Office Professional and Premium editions) and Microsoft FrontPage (available in the Premium edition).
Before you begin designing a PivotTable list, you should consider whether your users will interact with the data or only view the data.
PivotTable lists are designed to present lists and information from databases for interactive use. Depending on the results you envision, you might want to use a different Microsoft Office Web Component or include other controls along with the PivotTable list.
The design program is the program you use to create the PivotTable list. Different design programs have different capabilities.
Step 1: Prepare the source data
The source data is the information that you want to display and analyze in the PivotTable list. Depending on the design program you're using and the type of source data you want to display, you might need to set up a data source or create a query before you can include the data in the PivotTable list. A data source is a means of recording the information necessary to connect the PivotTable list to the data in a database, and a query is a means of specifying which information to retrieve from the database. For information and instructions about accessing source data from your design program for use in a PivotTable list, see Help for that design program.
When you publish a PivotTable report from Microsoft Excel to a Web page, Excel does part of the design work for you. However, some elements of PivotTable reports are changed when you save a report as a PivotTable list for the Web. You might need to modify some elements, such as custom calculations, to display the results you want.
Step 2: Create or open a PivotTable list
The specific steps to create a PivotTable list vary for different design programs. For specific information, see Help for your design program.
If you have an existing PivotTable list that you want to modify, such as one saved from a Microsoft Excel PivotTable report or copied from another Web page, you can open the file containing the PivotTable list in a design program and then activate the control by following the instructions in that program (usually by clicking or double-clicking the PivotTable list). For details, see Help for your design program.
When you create a new PivotTable list, you'll usually designate an initial area of your Web page for the list to occupy, relative to other elements on the page. After you attach the source data (see step 3 of this process), you can allocate the amount of space it can use and then move the PivotTable list to the best position (see step 4 of this process).
After you create or select a PivotTable list in a design program, you work in the PivotTable list and continue to design it by using the toolbar and the Commands and Options dialog box in the PivotTable list.
Step 3: Attach the source data to the PivotTable list
If you're working with an existing PivotTable list, the source data might already have been associated with the control and might also have been stored with the control itself. For a new PivotTable list, you need to establish a connection with the source data you've prepared in your design program.
Step 4: Allocate space for the PivotTable list
Within the PivotTable list itself, you can set a fixed height and width or allow the PivotTable list to expand up to a maximum size that you set, displaying scroll bars as necessary. These settings determine both the size of the PivotTable list in the browser and the size of the area you have to work with while designing the presentation of the data in the design program. Later, if you want a different amount of space for the PivotTable list, or if you want different settings for the browser than you are using to design, you can change these settings.
Step 5: Design the data layout
After you create a PivotTable list and add source data to it, the next step is to determine how you want the data to be presented when users first open your Web page.
Fit the presentation to your users' needs. Consider how users are likely to interact with the data. For example, if all of your users are familiar with PivotTable lists and will want to create their own data layouts and summaries, you might want to merely display some fields from the source data. However, if your users need a particular type of summary or view of the data, rely on you to do the layout work, or have a mix of different skill levels, you might want to lay out, organize, and format the data yourself.
Keep in mind that in some browsers, such as Microsoft Internet Explorer version 3.x, users cannot view or interact with the data. To interact with the data, users must have a browser that supports PivotTable lists.
Set up the initial layout. To display data in the PivotTable list, add fields from the source data to the drop areas for the different types of fields. Also consider how you want to summarize the data by creating and displaying totals.
Organize the data. After you add the fields and totals, you have several options to arrange how the results are displayed. You can sort the data to change the order of items of data in a field. To display a subset of the data, you can filter the fields to display only items of data that match the values you want to display, or you can selectively display or hide detail for a field or item of data.
Format the data. Formatting options include setting fonts and background colors, changing the display formats for numbers, aligning text within cells, changing column widths, displaying or hiding the drop areas for fields and formatting their captions, and displaying or hiding the expand indicators ( or
or  ) next to items. Also, you can add a title to the PivotTable list and format it.
Step 6: Restrict access in the browser
Even in a browser that fully supports PivotTable lists, such as Microsoft Internet Explorer 5, users do not have access to some of the commands and features that you can use in a design program. To prevent users from making changes or accessing parts of the source data that you don't want to make available, you can set more restrictions.
Step 7: Add other controls, automation, or help
You can do one or more of the following:
Include a chart. You can use another Microsoft Office Web Component, the Chart Component, to display a separate chart of the data in your PivotTable list. In the browser, when a user changes the data displayed in the PivotTable list, the chart is automatically updated. For example, if your PivotTable list provides data about stock prices over time, you can include a chart on the Web page to display the price trends graphically. When the user selects different stocks to view in the PivotTable list, the chart is automatically updated to reflect the selected stocks.
Write scripts. You can access and control many of the features and capabilities of PivotTable lists by using Web scripts or other programs. If you are familiar with writing scripts for Web pages in a language such as Visual Basic Scripting Edition (VBScript) or JavaScript, you might want to add scripts to the Web page to automate some tasks in the browser. For example, you might provide a script to change the PivotTable list to several of the most useful layouts and then add buttons to the Web page to select each layout. You can also enable users to run scripts from the toolbar and shortcut menus.
Your design program might provide tools for writing scripts. For example, the Microsoft Office programs provide the Microsoft Script Editor. For information about writing scripts, see Help for your design program. For information about accessing features of PivotTable lists by using scripts, see the programming Help for PivotTable lists.
Provide help. In the browser, users have access to separate Help available from within a PivotTable list that explains how to use its features, unless you restrict access to this Help. You can supplement this run-time Help by providing specific instructions or information on your Web page about using your PivotTable list. For example, you could tell users which database is supplying the source data and whom to contact for the password if you require one for access.
Before making the PivotTable list available to your users, it is recommended that you test it in a Web browser. Microsoft Internet Explorer 4.01 or later is recommended for users who want to interact with PivotTable lists. If your users have different browser versions, you might want to test the PivotTable list in each version to make sure all your users will be able to accomplish the tasks you intend at run time. If you provide your own help for the Web page, make sure your help looks and works the way you intended.
If you aren't satisfied with the PivotTable list and Web page, you can go back into the design program and make changes. In addition to changing the settings you made while you designed the data layout and customized the PivotTable list, you can change the layout or remove the fields that you don't want.
When you are satisfied with the results, make your Web page available to your users. For information about publishing Web pages, see Help for your design program or consult with your Webmaster.